After Pool Removal: Prepare Your Yard for Summer 2026
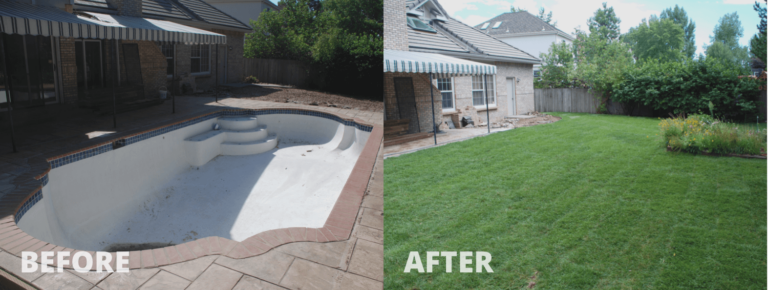
Did you know that removing a backyard pool can increase your property value by up to 15 percent, but only if the yard is properly restored afterward? If you have recently completed a pool demolition or are planning one before summer 2026, knowing how to prepare yard after pool removal is the most important step you can take to protect your investment and transform your outdoor space.
Without the right approach, the area left behind can become an eyesore, a drainage problem, or even a structural hazard. The good news is that with a clear plan, the right materials, and professional support, you can turn that empty space into a beautiful, functional yard that your family will enjoy all season long.
At Bye Bye Pool, we have helped hundreds of homeowners across the Bay Area reclaim their backyards after pool removal. In this guide, we will walk you through every step of the process, from soil preparation to landscaping, so you are ready to enjoy your new outdoor space by summer 2026.
Continue reading to discover how to prepare yard after pool removal the right way, avoid costly mistakes, and create the backyard of your dreams.
What Does It Mean to Prepare Your Yard After Pool Removal?
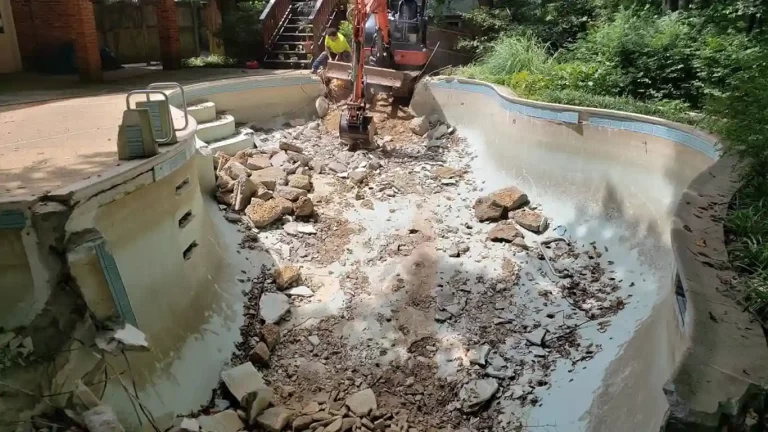
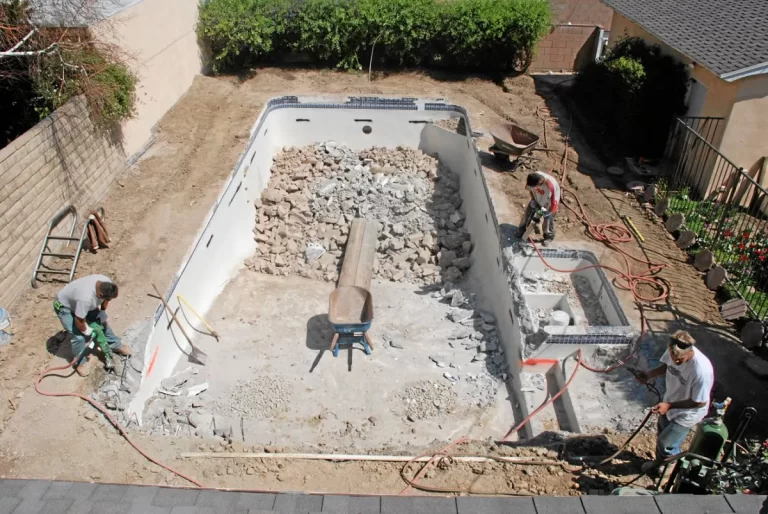
When you prepare yard after pool removal, you are doing far more than filling a hole. Pool removal, whether partial or full demolition, leaves behind compacted soil, disrupted drainage systems, uneven terrain, and sometimes residual concrete or debris. The preparation process involves a series of critical steps that ensure the ground is stable, safe, and ready for whatever you plan to build or grow on top of it.
Understanding this process is essential before you start planting grass or laying pavers. Skipping steps can lead to soil settling, flooding, or even sinkholes years down the road.
The Difference Between Partial and Full Pool Removal
There are two main types of pool removal, and each affects how you prepare yard after pool removal differently.
Full removal (exhumation): The entire pool shell, including walls and floor, is demolished and hauled away. The hole is then filled with clean fill dirt and compacted properly. This method allows for more versatile use of the land afterward, including building structures.
Partial removal (abandonment): The top portion of the pool is broken up and pushed into the bottom of the shell. Drainage holes are added, and the area is filled. This is a faster and less expensive option, but it limits future construction on that spot.
If you worked with a professional team like Bye Bye Pool, you likely received documentation of which method was used. That information will guide every decision you make as you prepare yard after pool removal.
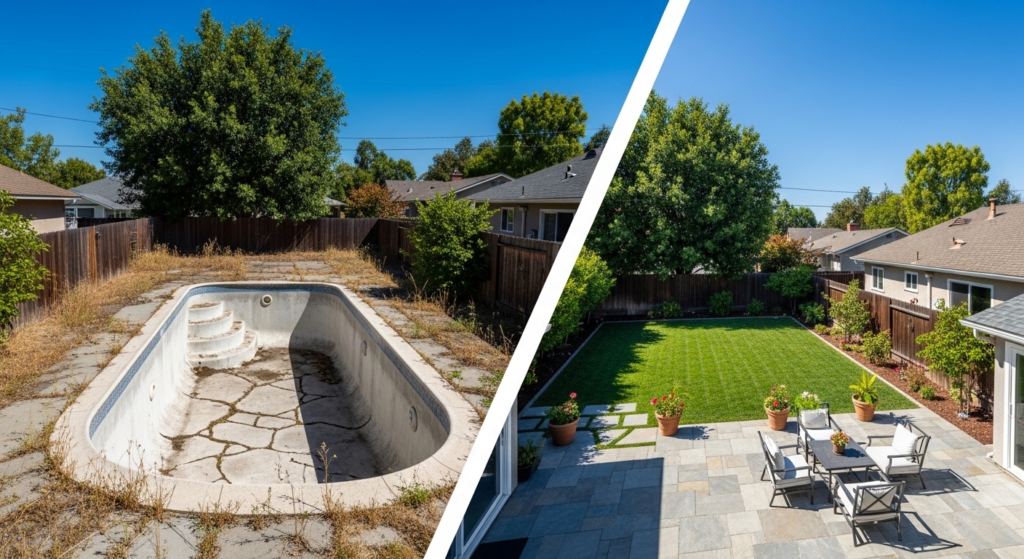
Why Properly Preparing Your Yard After Pool Removal Matters
Many homeowners underestimate the importance of this phase. They assume that once the pool is gone, the hard work is done. In reality, how you prepare yard after pool removal determines the long-term health of your landscape, the safety of your property, and the return on your investment.
Here are the key reasons this step cannot be skipped:
Soil stability: Improperly filled areas can settle unevenly over time, creating dips, cracks, and drainage problems.
Property value: A well-restored yard significantly increases curb appeal and resale value. A poorly restored one can actually decrease it.
Safety: Unstable ground can be dangerous for children, pets, and anyone walking through the yard.
Drainage: Pools disrupt the natural water flow of a yard. Restoring proper drainage prevents flooding and water damage to your home’s foundation.
Landscaping success: Plants, grass, and hardscaping all depend on healthy, well-prepared soil to thrive.
According to data from the National Association of Realtors, outdoor living spaces are among the top features buyers look for in a home. When you prepare yard after pool removal with intention and care, you are not just fixing a problem — you are creating an asset.
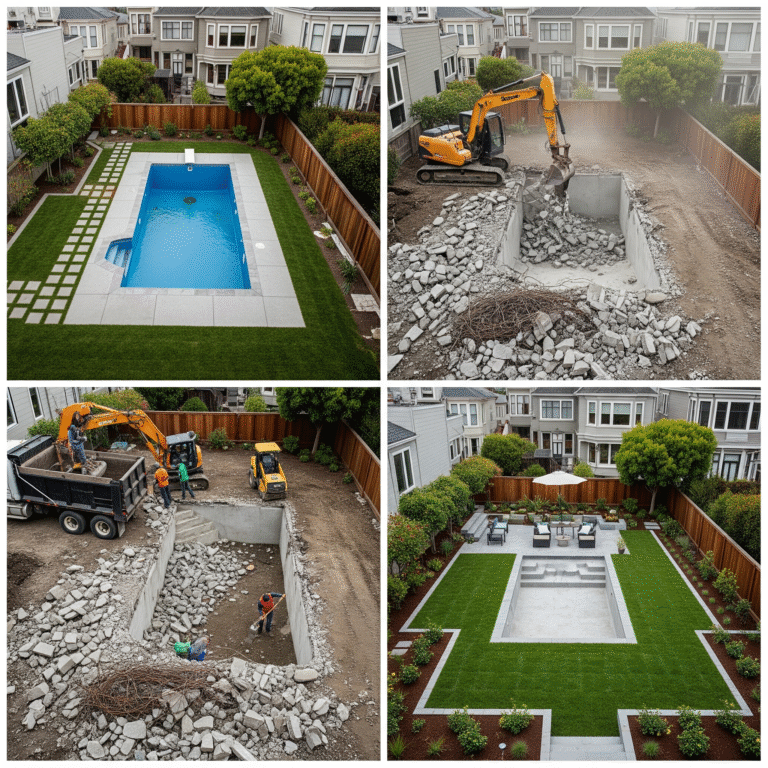
Step-by-Step Guide: How to Prepare Yard After Pool Removal
This is the core of what you need to know. Follow these steps in order to ensure a safe, beautiful, and lasting result.
Step 1: Assess the Condition of the Filled Area
Before anything else, inspect the area where the pool once stood. Look for:
- Uneven or sunken ground
- Cracks in surrounding concrete or pavers
- Signs of poor drainage or standing water
- Exposed debris or broken concrete
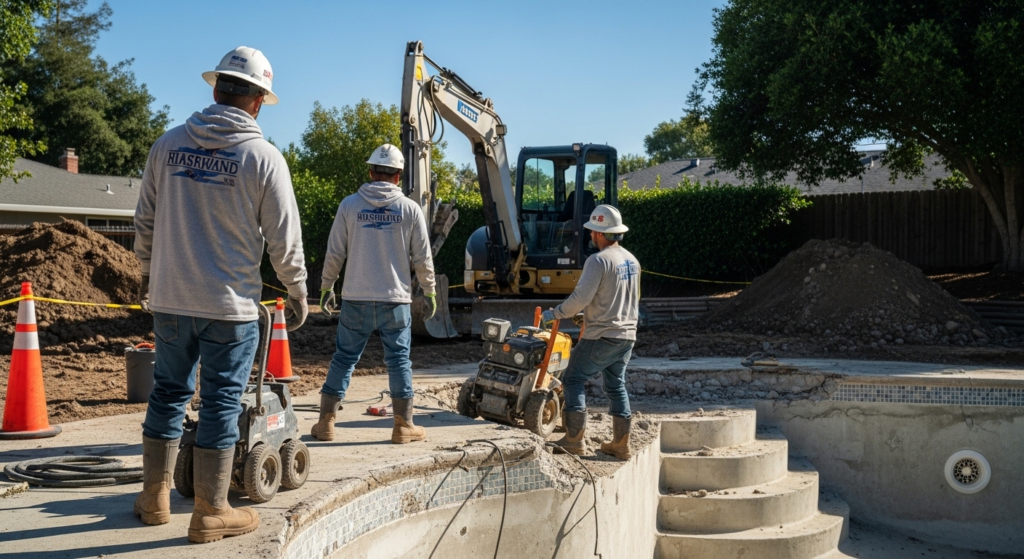
If you hired a professional pool removal company, ask for a post-removal inspection report. At Bye Bye Pool, every project includes a thorough assessment to ensure the fill meets local standards before the team leaves the site.
Step 2: Test and Amend the Soil
The fill dirt used after pool removal is typically clean but lacks the organic matter needed to support plant life. Before you prepare yard after pool removal for landscaping, conduct a soil test to determine:
- pH levels
- Nutrient content
- Drainage capacity
- Compaction levels
You can purchase a basic soil test kit at any garden center or send a sample to your local agricultural extension office. Based on the results, you may need to add compost, topsoil, or specific fertilizers to create a healthy growing environment.
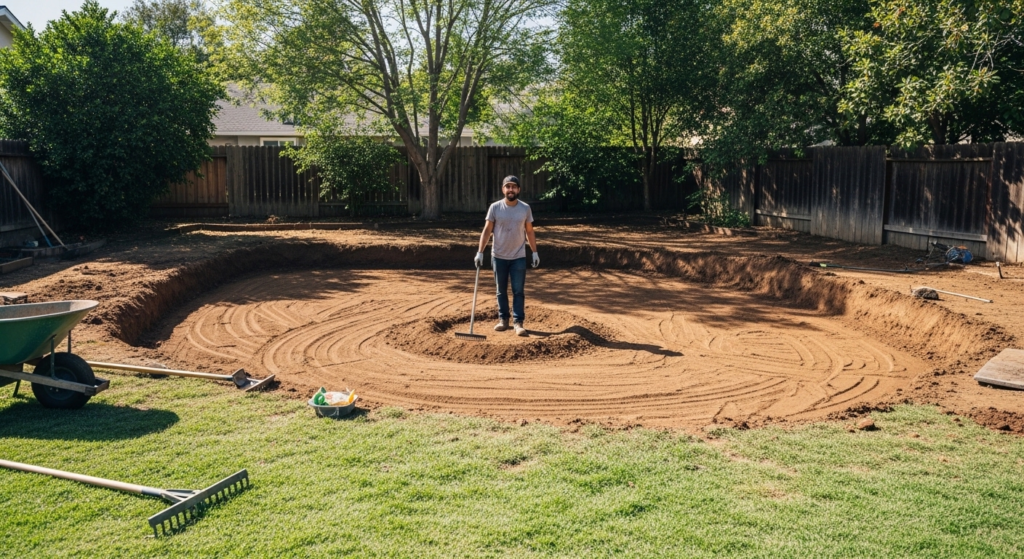
Step 3: Grade and Level the Ground
Proper grading ensures water flows away from your home and does not pool in the former pool area. This step is critical and often requires professional equipment.
The ground should slope gently away from your home at a rate of about one inch per foot for the first six feet. If you notice any low spots or uneven areas, add fill dirt and compact it before moving forward.
Step 4: Allow Time for Settling
This is the step most homeowners want to skip, but it is one of the most important. After filling and grading, the soil needs time to settle naturally. Depending on the depth of the fill and the type of soil, this can take anywhere from a few weeks to several months.
If you are working toward a summer 2026 deadline, plan your pool removal for late fall or early winter. That gives the soil adequate time to settle before you begin landscaping in spring.
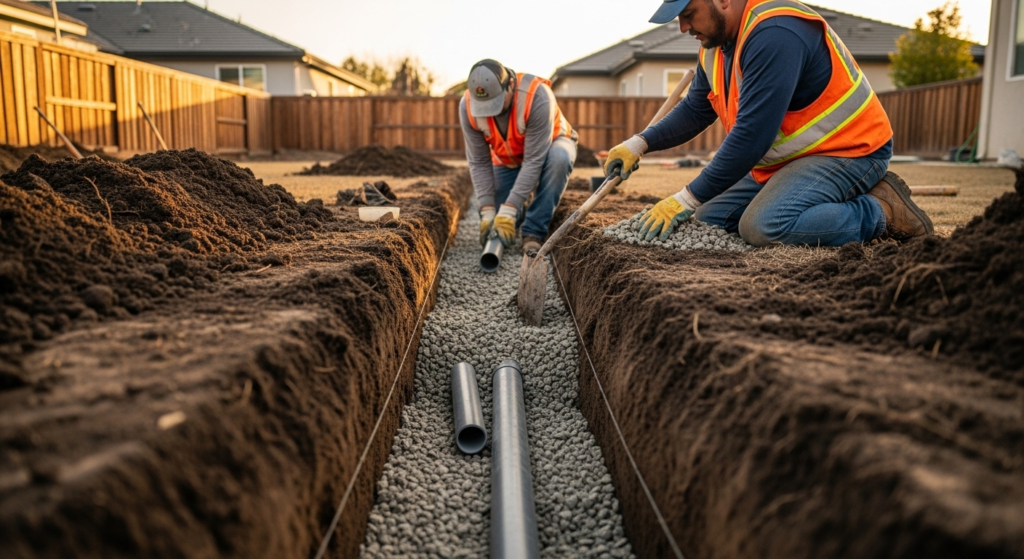
Step 5: Install or Restore Drainage Systems
Pools often have drainage infrastructure that is removed or altered during demolition. As you prepare yard after pool removal, evaluate whether your yard needs:
- French drains
- Surface drains
- Dry creek beds
- Regrading to redirect water flow
Poor drainage is one of the most common and costly problems homeowners face after pool removal. Addressing it early saves significant money and frustration later.
Step 6: Choose Your Landscaping Plan
Now comes the exciting part. Once the ground is stable, graded, and draining properly, you can begin planning what to do with the space. Here are the most popular options homeowners choose when they prepare yard after pool removal:
Lawn installation: Sod or seeded grass is the most common choice. It is relatively affordable, quick to install, and creates a clean, open look.
Garden beds: Raised or in-ground garden beds are a great way to add color, food production, and visual interest.
Patio or deck: A hardscaped area with pavers, concrete, or composite decking creates a functional outdoor living space.
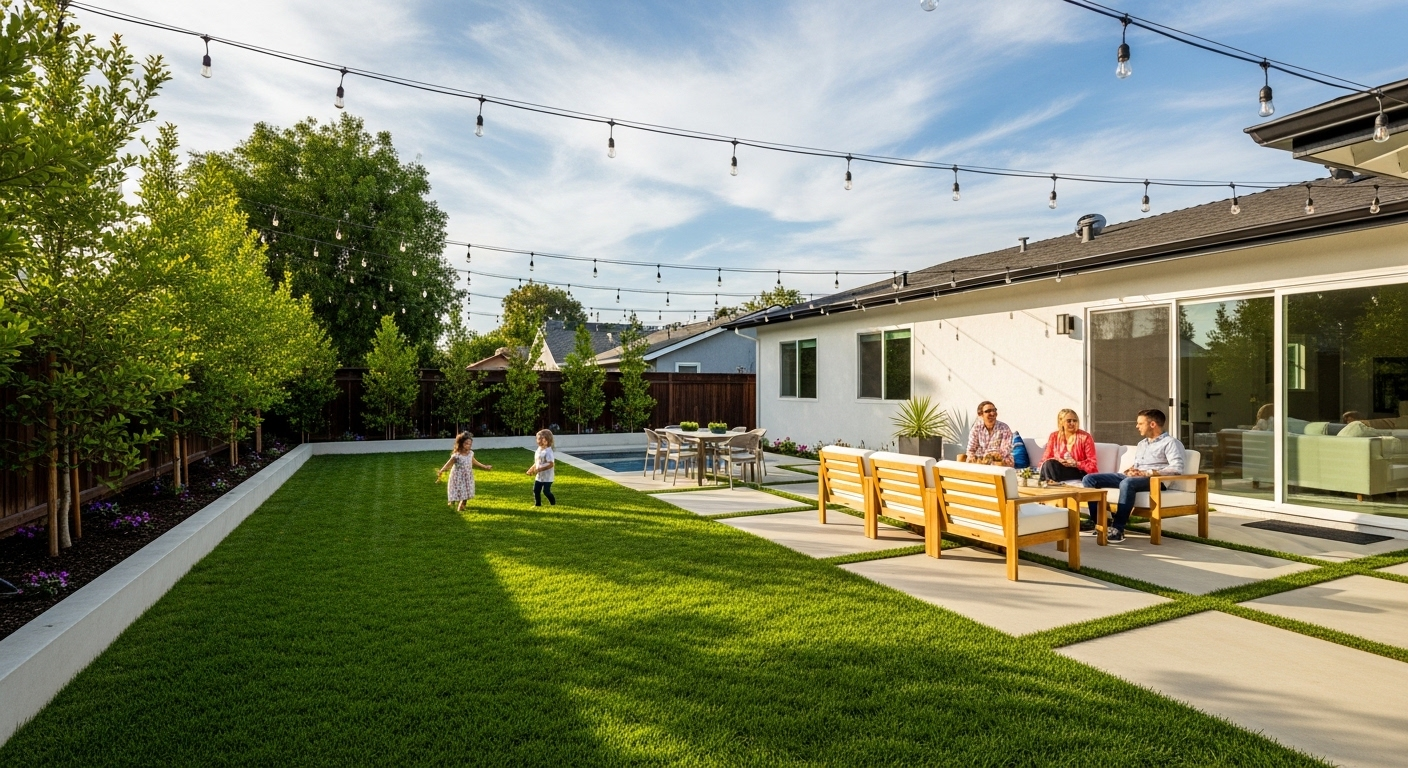
Outdoor kitchen or fire pit area: Many homeowners use the extra space to build an entertainment zone.
Playground or sports court: Families with children often convert the area into a play space or sport court.
Native plant landscaping: Low-maintenance, drought-tolerant plants are especially popular in California, where water conservation is a priority.
The right choice depends on your budget, lifestyle, and long-term goals for the property.
Real Customer Stories: Transformations Across the Bay Area
One of the best ways to understand what is possible when you prepare yard after pool removal is to hear from homeowners who have already done it.
Maria T., Concord, CA shared this review on Google: “We had our pool removed by Bye Bye Pool last fall and were nervous about what the yard would look like afterward. The team was incredibly professional, and they left the area perfectly graded and ready for our landscaper. By spring, we had a beautiful patio and garden where the pool used to be. Best decision we ever made.”
James R., Walnut Creek, CA wrote on Yelp: “I was skeptical about removing our pool, but after getting a quote from Bye Bye Pool, I realized it was the right move. The process was smooth, the crew was respectful of our property, and the yard looks amazing now. We installed a lawn and a fire pit area. Our kids love it.”
Sandra L., Pleasant Hill, CA noted: “The team at Bye Bye Pool walked us through every step of the process, including what we needed to do after the removal to prepare the yard. That guidance was invaluable. We now have a gorgeous outdoor dining area where our old pool used to be.”
These stories reflect a consistent pattern: when homeowners work with experienced professionals and take the time to properly prepare yard after pool removal, the results are transformative.
Ready to start your transformation? Contact Bye Bye Pool today for a free estimate and expert guidance on your pool removal project.
Common Mistakes to Avoid When You Prepare Yard After Pool Removal
Even well-intentioned homeowners make mistakes during this process. Here are the most common ones and how to avoid them.
Mistake 1: Rushing the Landscaping
Planting grass or installing hardscaping before the soil has fully settled is one of the most expensive mistakes you can make. The ground will continue to shift, causing uneven surfaces, cracked pavers, and dead plants. Be patient and allow adequate settling time.
Mistake 2: Ignoring Drainage
Drainage problems do not fix themselves. If you notice water pooling in the former pool area after rain, address it immediately before proceeding with any landscaping.
Mistake 3: Using Low-Quality Fill Dirt
Not all fill dirt is created equal. Using dirt that contains organic material, debris, or clay-heavy soil can lead to settling, drainage issues, and poor plant growth. Always use clean, compacted fill from a reputable source.
Mistake 4: Skipping the Soil Test
Planting directly into fill dirt without testing it first is a recipe for failure. Fill dirt lacks the nutrients and organic matter that plants need. Always test and amend before planting.
Mistake 5: Not Documenting the Removal
If you ever plan to sell your home or build a structure on the former pool site, you will need documentation of the removal method used. Make sure your contractor provides a permit, inspection report, and any relevant paperwork. The team at Bye Bye Pool handles all permitting and documentation as part of every project.
Tools and Materials You Will Need
Whether you are doing some of the work yourself or overseeing a contractor, knowing what tools and materials are involved helps you plan effectively.
Landscaping Ideas to Inspire Your Yard Transformation
When you prepare yard after pool removal, the blank canvas in front of you is full of potential. Here are some ideas that work especially well in the Bay Area climate.
California Native Garden
Replace your pool with a drought-tolerant native garden featuring plants like California poppy, lavender, salvia, and ornamental grasses. These plants thrive in the local climate, require minimal water, and attract pollinators.
Outdoor Entertainment Zone
Create an outdoor living room with a pergola, string lights, comfortable seating, and a built-in grill. This is one of the highest-return investments you can make in your backyard.
Vegetable and Herb Garden
With the extra space and full sun exposure that a former pool area often provides, a raised vegetable garden is a practical and rewarding choice.
Lawn with Play Area
For families with young children, a combination of soft lawn and a play structure creates a safe, fun environment that the whole family can enjoy.
Zen Garden or Meditation Space
A gravel garden with stepping stones, bamboo, and a small water feature creates a peaceful retreat right in your backyard.
For more inspiration and to see what is possible in your specific area, visit the Bye Bye Pool service areas page to learn about projects completed near you.
How Long Does It Take to Prepare Yard After Pool Removal?
This is one of the most common questions homeowners ask. The timeline depends on several factors, including the size of the pool, the removal method used, the condition of the soil, and the complexity of your landscaping plan.
Here is a general timeline to help you plan:
Week 1 to 2: Post-removal inspection, soil testing, and initial grading.
Week 3 to 8: Soil settling period. During this time, you can plan your landscaping design and order materials.
Week 9 to 12: Soil amendment, drainage installation, and final grading.
Week 13 to 16: Landscaping installation, including sod, plants, hardscaping, or other features.
Week 17 and beyond: Maintenance, watering, and establishment of new plants.
If you begin the pool removal process in late fall 2025, you will be well positioned to enjoy a fully transformed yard by summer 2026.

Local Considerations for Bay Area Homeowners
If you are located in Concord, Walnut Creek, Pleasant Hill, or anywhere in the greater Bay Area, there are specific local factors to keep in mind as you prepare yard after pool removal.
Water restrictions: California has strict water use regulations, especially during drought years. Choose drought-tolerant plants and consider drip irrigation systems to stay compliant and reduce your water bill.
Soil type: Much of the Bay Area has clay-heavy soil, which drains poorly. This makes proper grading and drainage installation even more critical in this region.
Permit requirements: Pool removal in Concord and surrounding cities requires permits. The Bye Bye Pool team is fully licensed and handles all local permitting requirements, ensuring your project is compliant from start to finish.
HOA rules: If you live in a community with a homeowners association, check their guidelines before making major landscaping changes.
Landmarks and neighborhood character: Many Bay Area neighborhoods have a strong sense of community aesthetic. Choosing landscaping that complements your neighborhood not only looks great but can also positively influence your property value.
For homeowners in Concord specifically, the Bye Bye Pool Concord page provides detailed information about local regulations, timelines, and what to expect during and after the removal process.
Frequently Asked Questions
How long should I wait to landscape after pool removal?
You should wait at least 30 to 90 days after pool removal before beginning major landscaping work. This allows the fill dirt to settle naturally. For full pool removals with deep fills, waiting up to six months is recommended to prevent uneven settling beneath new hardscaping or structures.
Can I build a structure on the area where my pool was?
If your pool was fully removed (exhumation method), you can typically build a structure on the site after proper compaction and settling. If a partial removal was performed, building structures directly over the filled area is generally not recommended. Always consult with a structural engineer and check local building codes before proceeding.
What is the best grass to plant after pool removal in California?
For Bay Area homeowners, drought-tolerant grass varieties like tall fescue, buffalo grass, or Bermuda grass are excellent choices. These varieties handle the local climate well, require less water than traditional lawn grasses, and establish quickly in amended soil.
How much does it cost to landscape a yard after pool removal?
The cost to prepare yard after pool removal and complete a basic landscaping project typically ranges from $3,000 to $15,000, depending on the size of the area, the type of landscaping chosen, and local labor rates. A simple lawn installation is on the lower end, while full hardscaping with a patio, drainage, and planting can reach the higher end of that range.
Does Bye Bye Pool help with yard preparation after removal?
Yes. Bye Bye Pool provides comprehensive pool removal services that include proper grading, compaction, and site preparation to ensure your yard is ready for landscaping. The team can also connect you with trusted local landscaping partners in the Bay Area. You can learn more on the FAQ page or reach out directly through the contact page.
Conclusion: Your Best Summer Yard Starts Now
Knowing how to prepare yard after pool removal is the key to turning a demolition project into a genuine home improvement. From soil testing and grading to drainage installation and landscaping, every step you take builds toward a safer, more beautiful, and more valuable outdoor space.
The process takes time and planning, but the results are absolutely worth it. Homeowners across the Bay Area have already discovered that removing an old, unused pool and transforming the space into a functional yard is one of the best decisions they have ever made for their families and their properties.
If you are ready to take the next step, the team at Bye Bye Pool is here to help. With years of experience serving homeowners in Concord, Walnut Creek, Pleasant Hill, and throughout the Bay Area, we handle every aspect of pool removal with professionalism, care, and attention to detail.
Ready to prepare your yard for summer 2026? Request your free estimate today and let the Bye Bye Pool team guide you through every step of the process.
You can also explore our service areas, learn more about our team, or visit our FAQ page for answers to your most pressing questions.
Bye Bye Pool 4918 Clayton Rd, Concord, CA 94521 Phone: +1 (925) 940-9978 Email: byebyepool.
Follow us on Facebook, Instagram, and read our reviews on Yelp and Google Maps.
![7 Powerful Steps to Prepare for a Successful Pool Demolition Project in California [Checklist]](https://byebyepools.com/wp-content/uploads/2025/04/7-Powerful-Steps-to-Prepare-for-a-Successful-Pool-Demolition--768x512.jpg)